Classroom Acoustics
Click here for the Adobe Acrobat PDF version
Click here for the Adobe Acrobat PDF version
The intent of this publication is to create a supplemental resource for architects, educators, and school planners for use with new construction or renovation of learning environments. The publication is not intended to replace the services of a professional acoustical consultant. It is to be used as an aid in the understanding of the elements of desirable listening conditions in classrooms.
This publication was prepared for the Technical Committee on Architectural Acoustics of the Acoustical Society of America by Benjamin Seep, Robin Glosemeyer, Emily Hulce, Matt Linn, and Pamela Aytar who, at the time of publication preparation, were senior students in the Architectural Engineering program at the University of Kansas. Supervision of this endeavor was provided by Bob Coffeen, FASA, a member of the the University of Kansas Architectural Engineering faculty.
This publication was printed in August, 2000.
The United States is currently in the midst of the largest campaign of school construction and renovation in history. With the increased emphasis on education, we must seize the opportunity to end a long-standing American practice: the building of classrooms with inferior acoustics. This invisible problem has far-reaching implications for learning, but is easily solved.
Excessive noise and reverberation interfere with speech intelligibility, resulting in reduced understanding and therefore reduced learning. In many classrooms in the United States, the speech intelligibility rating is 75 percent or less. That means that, in speech intelligibility tests, listeners with normal hearing can understand only 75 percent of the words read from a list. Imagine reading a textbook with every fourth word missing, and being expected to understand the material and be tested on it. Sounds ridiculous? Well, that is exactly the situation facing students every day in schools all across the country.
Many educators feel it is important to improve acoustics in classrooms used by children with hearing problems, but unnecessary to do so in those used by students with normal hearing. Yet many populations of students with "normal hearing" also benefit from better classroom acoustics. These include students with learning disabilities, those with auditory processing problems, and those for whom English is a second language. Often, such students are not placed in separate classrooms with enhanced acoustics, but are main-streamed with other students. Another group for whom learning is especially dependent on good acoustics is young children, who are unable to "predict from context." With their limited vocabulary and experience, if they miss a few words from a teacher’s lecture, they are less able than older students to "fill in" the missing thoughts. Given these considerations, it is clear that a wide range of students benefit from improved classroom acoustics.
Why should classroom acoustics problems be endemic, when solutions are not prohibitively expensive? The main reason is not lack of funds, but lack of awareness of the problem and its solutions. In 1998, an incredible $7.9 billion was spent on school buildings nationwide. For only a fraction more, all these spaces could have been designed or renovated to provide good listening conditions. For this to happen, however, school planners and architects must begin the design process with classroom acoustics in mind. The best way to solve acoustics problems is to prevent them beforehand, not correct them after the fact. During the design process, acoustics problems can usually be avoided with a bit of forethought and a different arrangement of the same building materials. Renovation of poorly designed classrooms is much more expensive. Even then, the cost of renovation is small compared to the social costs of poor classroom acoustics that impair the learning of millions of children.
The need for good classroom acoustics and the methods for attaining them have been known for decades, but this information has not been made readily available to architects, school planners, administrators, teachers, and parents. This booklet is designed to provide a general overview of the problems and solutions concerning classroom acoustics for both new construction and renovation. Straightforward, practical explanations and examples are given in the text; the Appendix provides quantitative definitions and calculations, as well as resources for more detailed information. The design of spaces with special acoustical requirements, such as theaters or music rooms, or any spaces with complex noise problems, are best handled by a professional acoustical consultant.
We often talk about wanting to build rooms with "good acoustics," but this has become a vague and almost meaningless term. There is no single, all-encompassing set of criteria that will yield "good acoustics" for all rooms and uses. Small classrooms, large lecture rooms, auditoriums, music rooms, cafeterias, and gymnasiums all have different acoustical requirements. To understand how these different spaces should be designed, we must first familiarize ourselves with a few basic properties of sound.
In the first century B.C., the Roman architect Vitruvius explained in De architectura, his famous 10-volume treatise on architecture, that sound "moves in an endless number of circular rounds, like the innumerably increasing circular waves which appear when a stone is thrown into smooth water … but while in the case of water the circles move horizontally on a plane surface, the voice not only proceeds horizontally, but also ascends vertically by regular stages." While Vitruvius did not understand everything about sound, he was correct about this particular point. In general, sound radiates in waves in all directions from a point source until it encounters obstacles like walls or ceilings. Two characteristics of these sound waves are of particular interest to us in architectural acoustics: intensity and frequency. Intensity is a physical measurement of a sound wave that relates to how loud a sound is perceived to be. We can also measure the frequency of a sound wave, which we perceive as pitch. For example, on a piano, the keys to the right have a higher pitch than those to the left. If a sound has just one frequency, it is called a pure tone, but most everyday sounds like speech, music, and noise are complex sounds composed of a mix of different frequencies. The importance of frequency arises when a sound wave encounters a surface: the sound will react differently at different frequencies. The sensitivity of the human ear also varies with frequency, and we are more likely to be disturbed by medium-to high-frequency noises, especially pure tones.
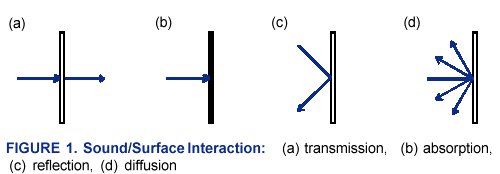
Think of sound as a beam, like a ray of light, passing through space and encountering objects. When sound strikes a surface, a number of things can happen, including: Transmission-- The sound passes through the surface into the space beyond it, like light passing through a window. Absorption-- The surface absorbs the sound like a sponge absorbs water. Reflection-- The sound strikes the surface and changes direction like a ball bouncing off a wall. Diffusion-- The sound strikes the surface and is scattered in many directions, like pins being hit by a bowling ball. (See Figure 1.) Keep in mind that several of these actions can occur simultaneously. For instance, a sound wave can, at the same time, be both reflected by and partially absorbed by a wall.
As a result, the reflected wave will not be as loud as the initial wave. The frequency of the sound also makes a difference. Many surfaces absorb sounds with high frequencies and reflect sounds with low frequencies. The Absorption Coefficient ( a) and NRC (noise reduction coefficient) are used to specify the ability of a material to absorb sound.
A special problem that results from reflected sound is that of discrete echoes. Most people are familiar with the phenomenon of shouting into a canyon and hearing one’s voice answer a second later. Echoes can also happen in rooms, albeit more quickly. If a teacher’s voice is continuously echoing off the back wall of a classroom, each echo will interfere with the next word, making the lecture difficult to understand. Echoes are also a common problem in gymnasiums.
Another type of echo that interferes with hearing is flutter echo. When two flat, hard surfaces are parallel, a sound can rapidly bounce back and forth between them and create a ringing effect. This can happen between two walls, or a floor and ceiling.
Sound intensity levels and sound pressure levels can be measured in decibels (dB). In general, loud sounds have a greater dB value than soft sounds. Because the decibel scale is logarithmic rather than linear, decibels can not be added in the usual way.
An important acoustical measurement called Reverberation Time (RT or RT(60)) is used to determine how quickly sound decays in a room. Reverberation time depends on the physical volume and surface materials of a room. Large spaces, such as cathedrals and gymnasiums, usually have longer reverberation times and sound “lively” or sometimes “boomy.” Small rooms, such as bedrooms and recording studios, are usually less reverberant and sound “dry” or “dead.”
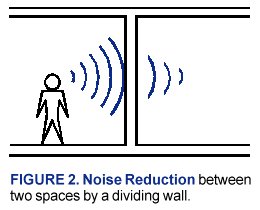
The Noise Reduction (NR) of a wall (also expressed in dB) between two rooms is found by measuring what percentage of the sound produced in one room passes through the wall into the neighboring room. (See Figure 2.) The NR is calculated by subtracting the noise level in dB in the receiving room from the noise level in the source room.
Signal-to-Noise Ratio (S/N) is a simple comparison that is useful for estimating how understandable speech is in a room. The sound level of the teacher’s voice in dB, minus the background noise level in the room in dB, equals the S/N in dB. The larger the S/N, the greater the speech intelligibility. If the S/N is negative (i.e., the background noise is louder than the teacher’s voice), the teacher will be hard to understand. Note also that the S/N varies throughout the room as the signal and noise levels vary. Typically, the S/N is lowest either: (1) at the back of the classroom, where the level of the teacher’s voice has fallen to its minimum value; or (2) near the noise source, where the noise level is at its maximum, such as near a wall air conditioning unit. Studies have shown that, in classrooms having a signal-to- noise ratio of less than +10 dB, speech intelligibility is significantly degraded for children with average hearing. Children with some hearing impairment need at least a +15 dB S/N ratio.
Speech intelligibility can be evaluated in existing rooms by using word lists. Several tests are performed wherein one person recites words from a standard list, and listeners write down what they hear. The percentage of words listeners correctly hear is a measure of the room’s speech intelligibility.
For those interested in learning more about these topics, additional information is provided in the Appendix.
Now that we have familiarized ourselves with these fundamentals of acoustics, we can learn how to apply them to achieve satisfactory hearing conditions in classrooms. The following guidelines are designed for a typical classroom of approximately 30 students, where lecturing is done from the front of the room or students work in small groups. Recommendations for gymnasiums, cafeterias, and auditoriums are given in a following section.
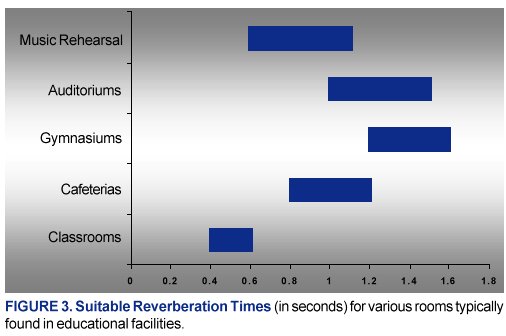
Though long reverberation time (RT) is the “common cold” of bad classroom acoustics, there is a cure. Ideally, classrooms should have RTs in the range of 0.4-0.6 seconds, but many existing classrooms have RTs of one second or more. Figure 3 gives suitable reverberation times for various rooms typically found in educational facilities. The RT can be estimated fairly easily for both built and unbuilt classrooms with the use of the Sabine equation (see page 10). The variables are the physical volume (ft 3 ) of the room, the areas (ft 2 ) of different surface materials, and the absorption coefficients of those materials at certain frequencies. The absorption coefficient is a measure how much of the energy of a sound wave a material will absorb.
There are two ways to reduce the RT of a room: either the volume must be decreased or the sound absorption must be increased. Though decreasing the volume is not always an option, it is a viable alternative for many older classrooms with high ceilings. In such spaces, adding a suspended ceiling of sound-absorbing tile can significantly improve the acoustics by simultaneously decreasing the volume and increasing absorption. However, adding a suspended ceiling often requires new light fixtures and can interfere with tall windows. The case study presented later shows an alternative solution for classrooms with high ceilings.
Increasing the absorption in a room is accomplished by adding more “soft” materials, such as fabric-faced glass fiber wall panels, carpet, or acoustical ceiling tiles. Many products are commercially available for this purpose, and - with forethought - it is possible to design a classroom with an acceptable RT using common building materials. Absorptive materials work best when spread throughout the room and not concentrated on just one wall or the floor or ceiling. In many classrooms, a suspended ceiling of acoustical ceiling tiles alone will decrease reverberation time to the desired range; however, this will not address the problem of echoes from the walls. Nor are all “acoustical” ceiling tiles created equal. Check the specifications and look for ceiling tiles with an NRC of 0.75 or better. In order to absorb both low- and high-frequency sounds, it is necessary to suspend the ceiling below the structural ceiling. Simply adding carpeting to a classroom floor will not significantly reduce reverberation time, especially at low frequencies, but carpeting will reduce noise resulting from students sliding their chairs or desks on the floor.
For those interested in calculating the RT of an existing classroom or estimating how much absorption is necessary, the Appendix includes examples and a table of absorption coefficients for some common materials.
As mentioned above, echoes interfere with speech intelligibility. Echoes can be controlled using absorption and/or diffusion. When locating absorptive materials to reduce reverberation time, consider how they might help reduce echoes as well. Placing an absorptive material on the rear wall of a classroom prevents the teacher’s voice from reflecting back to the front of the room. While absorption is one way of minimizing reflected energy into the classroom, another approach utilizes diffusion. Placing a diffusing element on the rear wall of the classroom scatters the sound into many directions, so that the level in any one particular direction is greatly reduced. Flutter echo is a particularly significant problem when it occurs between the walls at the front of the room where the teacher is speaking. A simple way to test whether flutter echo is a problem is to stand near the center of the classroom, between parallel surfaces, and clap hands once sharply. If flutter echo exists, a zinging or ringing sound will be heard after the clap as the sound rapidly bounces back and forth between two walls. Try turning in different directions and clapping again to determine which walls are causing the flutter echo. To eliminate flutter echo between two hard, parallel walls, cover one or both of them with fabric-faced glass fiber panels or a similar sound-absorbing material. This works well if the panels are staggered along the opposite walls so that a panel on one wall faces an untreated surface on the opposite wall. Splaying two walls at least eight degrees out of parallel will also eliminate flutter echo between them.
So far we have discussed methods for reducing reflections in classrooms, but in some cases we want to reinforce certain reflections. This is especially true in large classrooms that have short reverberation times. The sound energy of the teacher’s voice can be absorbed by the soft ceiling before it reaches students at the back of the room. The teacher’s voice can be spread throughout the room by shaping a sound-reflecting gypsum board ceiling over the front of the room, or by making the center of the ceiling a hard, reflecting surface. These surfaces will reflect sound toward the rear of the room. In order to maintain a low reverberation time with reflectors in the room, it will likely be necessary to add absorptive materials on the side and rear walls. The need for reflectors depends on the teaching methods used. For example, reflectors are useful in rooms used mostly for lecturing, but are not needed in rooms used only for small-group work or as laboratories.
High ambient noise from mechanical equipment such as noisy heating, ventilation and air conditioning (HVAC) systems is all too common in existing schools. This is a serious problem for teachers and students alike. Teachers must raise their voices to maintain the +10 dB signal-to-noise ratio necessary for good speech intelligibility. That results in many teachers taking several sick days each year as a result of vocal strain, costing taxpayers money that would have been better spent on quiet mechanical equipment. At the same time, students must either struggle to hear or else become distracted and stop paying attention. Mechanical noise is primarily the result of poor planning and can be difficult and expensive to fix in existing classrooms. However, excessive mechanical noise can be eliminated at little or no extra cost if the system is designed properly in the first place. Mechanical engineers are sometimes unaware of or insensitive to this problem, and should be reminded that noise control is a critical issue that must be handled during the design and purchasing process.
There are many methods for measuring the loudness of mechanical noise. A good guideline is that the noise level in classrooms should not exceed NC 25 to 30. The NC, or Noise Criteria, rating is determined by measuring noise levels at certain frequencies, plotting these levels on a graph, then comparing the results to established NC curves. (A more detailed explanation is contained in the Appendix.) Another useful guideline is that the noise level should not exceed 35 dBA. This is an easily measured, single-number rating of the noise level over all frequencies that reduces the indicated noise level at lower frequencies to simulate the sensitivity of the ear. Typically, the noise level of a room in dBA is 5 to 7 dB higher than the NC rating. (Converting sound levels as measured in octave frequency bands to dBA is also explained in the Appendix.)
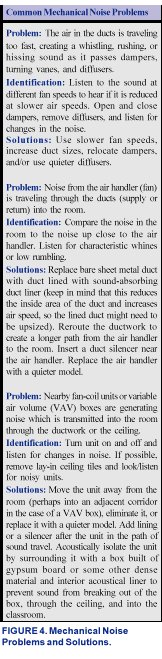
Finding the source of mechanical noise in a room is sometimes as difficult as finding the proverbial needle in a haystack. The noise can originate from one or many sources, and complex cases are best handled by a professional acoustical consultant with the skills and equipment to locate and reduce the levels of all noise sources. Bearing that in mind, Figure 4 lists a few common problems you can look for in an existing classroom with excess mechanical noise resulting from a central mechanical system that distributes air to the rooms through ductwork.
For mechanical system noise the old adage, “an ounce of prevention is worth a pound of cure,” is certainly true. To limit such noise, keep the following guidelines in mind when designing new classrooms:
Noise from adjacent rooms disrupts the learning process, especially during quiet reading times or test-taking. Fifty years ago, when school walls were typically built of heavy brick or concrete block, this was not as much of a problem. In recent decades, the need to lower construction costs has led to the use of thin, lightweight wall materials that provide little noise reduction. Even worse, in the 1960s and 1970s many open plan classrooms were built with no partitions whatsoever between classrooms. In some schools, such spaces have since been partitioned, but noise reduction between rooms may still be insufficient.
If you are unsure whether the wall between two existing classrooms is adequate, try this simple test: Set up a television or video monitor in one room and set the sound level so it can be comfortably heard in the back of the classroom. Then go into the neighboring classroom and listen for sounds from the equipment next door. If sounds are faint or inaudible, the barrier is sufficient. If sounds are fairly loud, and especially if words are intelligible, the partition between the rooms needs to be improved.
Figure 6 shows examples of both good and bad gypsum board wall construction. In general, as the mass of a wall is increased, its noise reduction also increases. However, a thick, solid wall is usually too expensive and heavy and wastes valuable floor space. Therefore, an effective compromise is to construct a wall of a layer of heavy material, an airspace, and another layer of heavy material. A typical example would be a stud wall having two layers of 5/8 inch thick gypsum board on each side. When constructing such a wall, be sure to overlap the layers of gypsum board so the joints on both layers do not line up and create a gap that sound can pass through. Adding glass fiber or mineral fiber insulation to the cavity in the middle of the wall can also reduce noise transmission.
In terms of noise reduction, a wall is like a chain: it is only as strong as its weakest link.

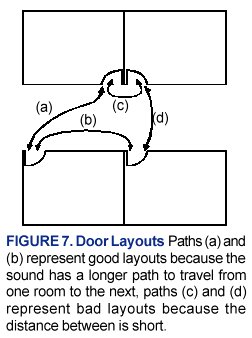
Windows, doors, small gaps, cracks, grilles, louvers, etc. can completely negate a wall’s effectiveness. Gaps between walls and the floor and ceiling should be sealed with an acoustical sealant. Thin or hollow-core doors with large gaps under them commonly cause sound leaks in otherwise good walls. Solid doors with tight-fitting, sealed frames are best. Their location also matters. For example, it is best not to pair up doors to adjacent rooms, as this provides a short path through which sound may travel from one room, through the doors, and into the next room. (Figure 7 shows both good and bad layouts.) Also, classroom doors should not be placed directly across a hall from one another. Staggering doors across a hallway creates a longer, less direct path for noise to travel from one room to another.
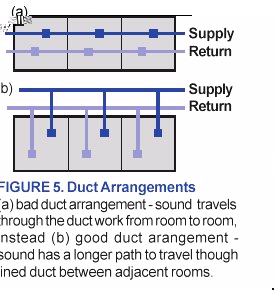
To be effective, partition walls should extend from the structural floor to the structural ceiling. Otherwise, sound from one room can easily pass through a lay-in acoustical tile ceiling, over the partition wall, and down through the lay-in ceiling of the next room. (See Figure 8.) This is commonly overlooked when walls are added during renovations, such as when open-plan classrooms are partitioned.
Preventive design can often eliminate the need for thick, expensive walls. During the design process, consider which rooms will be noisy (mechanical rooms, gymnasiums, cafeterias, music rooms, industrial design shops, etc.) and use buffer areas (hallways, storage rooms, and restrooms) to separate these spaces from critical listening areas (classrooms, libraries, special education areas, and offices).
The noise reduction of exterior walls is also important since many noisy and potentially disruptive activities go on outside the school. Most schools are built with brick or concrete block exterior walls, which are good sound barriers, but with inadequate windows that permit considerable sound transmission. To provide noise reduction, windows must be well sealed. Double-paned glass provides better noise reduction than single-paned glass (as well as better thermal insulation and decreased energy costs). Other common sound leakage culprits are wall-mounted unit ventilators that duct directly outside. These units not only transmit exterior noise but generate ample noise themselves; they should be avoided whenever possible.
During site planning, consider external noise sources that could disrupt learning and attempt to locate classrooms away from such areas. Common noise sources include: aircraft flyovers, busy roads, idling school buses, playgrounds, playing fields, exterior mechanical equipment, dumpsters being emptied by garbage trucks, lawn mowers, and noisy machinery in nearby buildings.
Sound reinforcement systems, often referred to as “soundfield” or “soundfield FM” systems, are sometimes suggested as relatively inexpensive solutions for classrooms with poor signal-to-noise ratios.

A typical system consists of a wireless microphone worn by the teacher and one or more loudspeakers located at the front of the room, in the ceiling, or along the walls to distribute the sound to the students. Amplifying the teacher’s voice raises the signal-to-noise ratio, which improves speech intelligibility and reduces vocal strain. This can be useful in a room with a moderate amount of mechanical noise that would otherwise be difficult or expensive to silence. However, such systems also have their limitations. An overly-reverberant classroom, for example, will cause the sound from the loudspeakers to build up and remain unintelligible. Whether or not a sound reinforcement system is used in the classroom, it is vital to employ acoustical treatments that reduce reverberation time.
Another drawback to sound reinforcement systems is that they amplify only the teacher. Students are not amplified when they ask the teacher questions or talk among themselves while working in groups. Some systems provide an extra handheld microphone that students can pass around. However, this is a cumbersome solution that interferes with spontaneous discussions. Also, if the microphone is not kept close to the person speaking, it will pick up as much ambient noise as speech, and the S/N will not be improved. Still another problem is that the amplified sound will become noise for adjacent classrooms. Despite these shortcomings, sound reinforcement systems can be cost-effective improvements for classrooms with high noise levels, and are usually better than no modifications at all.
How do all of these pieces of the puzzle fit together? This section provides examples of good and bad classroom acoustics to illustrate how architectural finishes can be used to control reverberation and echoes.
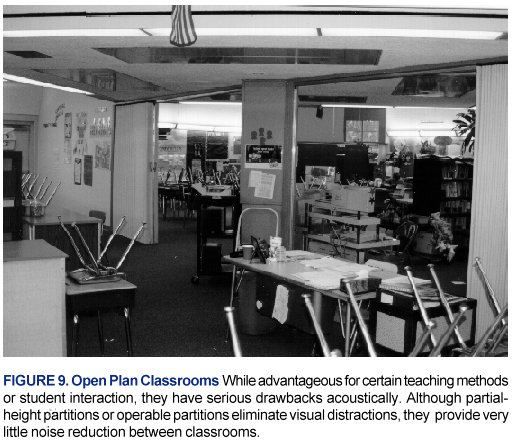
From an acoustical standpoint, open-plan classrooms are perhaps the worst. While they can be advantageous for certain teaching methods or student interaction, they have serious acoustical drawbacks. Students are easily distracted by acoustical and visual signals that spill over from adjacent classes. And if students with hearing impairment or attention deficit disorders have difficulty concentrating on the teacher’s voice in a classroom with loud mechanical noise, consider their plight in a classroom where the background noise is not random but rather an intelligible signal. To combat these problems, many open-plan classrooms have been divided with partial-height partitions or operable partitions that slide out like curtains. While these barriers do help students focus by eliminating visual distractions, they provide little noise reduction between classrooms. (Figure 9 shows an example of an open plan.)
Another undesirable design is the classroom with a tall plaster or gypsum board (hard) ceiling, hard walls and hard tile floor. In such a classroom, echoes and reverberation tend to destroy speech intelligibility, especially for young children. Unlike mechanical noise, reverberation cannot be overcome by raising the level of the teacher’s voice. An acoustical treatment must be added to increase absorption and reduce harmful echoes. (See Figure 10a.) For suggestions on materials, refer to the section in the Appendix on reverberation time. For a nontraditional solution, read the case study below.
Simply including a sound-absorbing lay-in ceiling and thin carpet on the floor will usually result in good classroom acoustics and low reverberation time. This solution is inexpensive for new construction and is also an affordable way to renovate existing classrooms. For small to moderate-sized classrooms, the lay-in ceiling will provide an acceptable reverberation time, provided that acoustical ceiling tiles with an NRC greater than 0.75 are used. The carpet adds some high-frequency absorption, but primarily serves to reduce self-noise from the students. (Refer to Figure 10b.) Unfortunately, this approach does nothing to control echoes from the walls. However, thoughtful arrangement of furniture such as cabinets and bookcases can help break up large, flat walls and reduce echoes.
The best design for a lecture-style classroom would be to move some of the absorption from the ceiling to the walls and keep the middle of the ceiling hard to reflect the teacher’s voice toward the back of the room. This seemingly complex, partially absorptive and partially reflective ceiling can be easily built with a standard ceiling grid. Simply place acoustical ceiling tiles around the perimeter of the ceiling and gypsum board panels in the center of the grid. To reflect more sound to the back of the room, the ceiling can be shaped over the teacher’s location at the front of the room. This reflecting surface should be built from a hard material like plywood or gypsum board, and can be painted to match the room. Placing absorptive materials on the walls simultaneously reduces reverberation time and kills echoes. Fabric-covered, 2 inch thick glass fiber panels are a good choice because they are attractive, fairly rugged, and provide some absorption at low frequencies. Add thin carpeting to the floors, and the result can be an acoustically wonderful classroom, with a low reverberation time, no echoes, proper distribution of reflections, and low self-noise, all achieved with common building materials. (See Figure 10c.)
The topic of this case study is a classroom in an older university building that was the subject of complaints from teachers about the generally poor acoustical conditions including high noise levels and poor speech intelligibility. While this is a university classroom, its design is typical of many classrooms in older elementary and secondary schools. The room, shown in Figure 11, has high plaster ceilings and many tall windows. The building was originally constructed with no central air conditioning system, so several window air conditioners were added, which were very noisy. In order to properly prepare recommendations for improving the acoustical conditions of this room, the ambient noise levels as established by the window air conditioning units were measured and the reverberation times of the room were also measured. It was important that acoustical conditions be improved without adveresly affecting room aesthetics.
Due to the high ceiling and lack of absorptive materials in the room, reverberation time was an unsatisfactorily long 1.5 seconds at middle frequencies. Adding a suspended ceiling of acoustical ceiling tiles would have improved the space acoustically but not visually. To avoid interfering with the tall windows, the suspended ceiling would have to be sloped up at the sides, and a new lay-in ceiling would not have matched the traditional architecture of the classroom. Instead, 2 inch thick, dense glass fiber panels, covered with fabric that complemented the color scheme in the room, were suspended from the ceiling at the same level as the existing pendant-mounted lighting fixtures. This resulted is an aesthetically pleasing solution without the expense of replacing the lighting fixtures, which would normally be necessary when adding a suspended ceiling. Fabric faced glass fiber panels were also mounted on the walls between the windows to prevent echoes and further decrease reverberation time. After modification, the unoccupied reverberation time was reduced to a desirable 0.5 seconds in the middle frequencies. Similar solutions could be applied to many classrooms where suspended acoustical tile ceilings are not suitable.
The air conditioning system for this room was also modified with mixed acoustical results. The original window air conditioners created an unacceptably high noise level described by NC-57. The school decided to replace the window units with a wall mounted, two speed fan/coil unit and with the compressor properly located outside. This improved room cooling but it did not completely solve the noise problem. With the fan at high speed, the noise in nearby seating areas is NC-47, 10 points lower than the original NC-57, but still not suitable. On the opposite side of the room the noise is NC-43. with the fan at low speed the noise is NC-36 and NC-33. With low speed operation the noise is relatively close to the criteria (see page 4). But, at high speed the noise is significantly above the criteria. When in-room fan/coil units must be used for economic or physical reasons, multi-speed units should be employed, and the units should be capable of handling the cooling task with low speed fan operation.
Though this booklet is primarily intended to provide guidelines on classroom acoustics, this section addresses acoustical issues for other common schoolrooms. While these guidelines are not as comprehensive as the material on classrooms, much of the material presented earlier, such as the need to eliminate mechanical noise and provide effective noise reduction, also applies to rooms such as cafeterias, gymnasiums, and auditoriums. This section does not attempt to cover music education rooms since the acoustics of these spaces are especially critical. Special purpose rooms are complex and best handled by a professional acoustical consultant.
The most common problem plaguing cafeterias and gymnasiums is excessive reverberation time (RT), since they typically have both large physical volume and hard surface materials. In cafeterias, this long RT causes noise buildup, with students having to speak louder and louder to hear each other until there is a continuous roar. In gymnasiums, which are frequently used for pep rallies and assemblies, combining poor acoustics with a badly designed sound system produces speech that is nearly unintelligible and wreaks havoc on music.
Several options are available for improving sound absorption in these large spaces. In new construction, if the ceiling is constructed as an exposed metal deck, consider using metal deck with perforations on the bottom and glass fiber above to absorb sound. This will significantly reduce reverberation time without adding unduly to construction costs. Another option for either new construction or renovation is to hang absorptive baffles or banners from the ceiling. Baffles and banners are commercially available products made of several inches of glass fiber covered with thin plastic or cloth. They are easily installed, available in a rainbow of colors, and do not detract from the appearance of the room. Placing glass fiber or wood fiber panels on the walls will also reduce both RT and echoes.
Gymnasiums and cafeterias tend to be noisy spaces, and this noise can also disrupt nearby classrooms. Thus, separate these areas from classrooms, and do not place classrooms beneath gymnasiums. The impact noise from bouncing basketballs and the like is a severe problem that is expensive to correct in new construction and even more expensive in renovations.
School auditoriums accommodate a variety of activities, including speech, theater, dance, and music. All these activities require good acoustics, but each has different acoustical requirements. To meet the needs of all these activities, an auditorium’s acoustics must either be compromised so it performs adequately for all functions, but favorably for none, or else a technique called “variable acoustics” must be used to adapt its acoustics to suit each function. Variable acoustics involves the use of panels, drapery, and other materials that can be easily rearranged to alter reflections, reverberation time, and other acoustical properties. To achieve satisfactory results for these complex rooms , it is best to seek the assistance of a professional acoustical consultant. That said, the following paragraphs provide a few design guidelines to follow and common pitfalls to avoid.
Combining the auditorium with the cafeteria or gymnasium is a tempting way to save both money and square footage. Unfortunately, this rarely, if ever, results in an acoustically satisfactory auditorium since the rooms have conflicting requirements. In an auditorium, the objective is to reinforce sound from a single location, while in cafeterias and gymnasiums the goal is to suppress noise from many sources. This conflict cannot be resolved effectively, so these room combinations should be avoided. In an auditorium, the shape of the room is important to properly reflect sound into the audience. Avoid wide, fan-shaped halls with concave rear walls having a radius centered on the stage. A concave rear wall will focus disturbing echoes back to the performers on stage, and if the side walls are splayed too wide, they will not provide useful early reflections into the seating. To allow reflected sound to reach those seated in the back, under balcony depth should be less than twice the distance to the floor below. A flat ceiling will send all reflections to the back of the hall, so sections of the ceiling should be angled to spread reflections throughout the audience. Convex diffusing panels shaped like pyramids or cylinders or special “QRD” diffusers help scatter sound throughout the auditorium and reduce discrete echoes. Walls can be covered with heavy drapery that slides horizontally or rises vertically to add absorption when necessary and remove it when unnecessary.
NOTE: An ANSI Standard on classroom acoustics is presently under development. Contact the Acoustical Society of America for further information. (See the back cover for the address, phone number and website.)
Frequency is an important factor in most acoustical measurements. Sound occurs when a vibrating source causes small fluctuations in the air, and frequency is the rate of repetition of these vibrations. Frequency is measured in hertz (Hz), where 1 Hz = 1 cycle per second. A young person with normal hearing can detect a wide range of frequencies from about 20 to 20,000 Hz. In order to deal with such a large spectrum, acousticians commonly divide the frequency range into sections called octave bands. Each octave band is identified by its center frequency. For the standard octave bands these center frequencies are: 63, 125, 250, 500, 1000, 2000, 4000, and 8000 Hz. As you can see, the ratio of successive frequencies is 2:1, just like an octave in music. This also correlates with the sensitivity of the ear to frequency, since a change in frequency is more readily distinguished at lower frequencies than at higher ones. For example, the shift from 100 to 105 Hz is more noticeable than the shift from 8000 to 8005 Hz. Higher-frequency octave bands contain a wider range of frequencies than lower-frequency octave bands, but we perceive them as approximately equal. To obtain a more detailed indicator of the spectrum of sound power, measurements are often made in the one-third octave frequency bands. Standard center frequencies for the one-third octave bands are: 50, 63, 80, 100, 125, 160, 200, 250, 315, 400, 500, 630, 800, 1000 Hz, etc. Note that an octave band contains the one-third octave band at the standard octave band center frequency plus the one-third octave bands on each side.
The most common measure of a sound’s level is Sound Pressure Level, or SPL, expressed in decibels, abbreviated dB. Decibels are not typical units like inches or pounds in that they do not linearly relate to a specific quantity. Instead, decibels are based on the logarithmic ratio of the sound power or intensity to a reference power or intensity. Sound power and intensity are not easy to measure. However, sound pressure is easily measured with a sound level meter. Sound pressure may also be expressed in dB since sound pressure squared is proportional to sound power or intensity. We use dB instead of the actual amplitude of the sound in units of pressure because its logarithmic value represents the way our ears interpret sound and because the numbers are more manageable for our calculations. Most sounds fall in the range of 0 to140 dB, which is equivalent to waves with pressures of 20 to 200,000,000 micropascals (or 2 x 10 -10 to 2 x 10 -2 atm). To help you get a feeling for sound pressure levels (in dB), the approximate SPLs of some common sound sources are given in Figure 12.
A simple sound level meter combines sound pressure levels over all frequencies to give the overall SPL in dB. More complex meters have filters that can measure the SPL in each octave band or one-third octave band separately so we can identify the level in each band, thus identifying the spectrum of the sound. Sound level meters can also “weight” the sound pressure level by adjusting the level in different frequencies before combining the levels into a weighted overall level. For example, A-weighting reduces the level of sounds at low frequencies to simulate the variations in sensitivity of the ear to different frequencies. A-weighted values are denoted as dBA to differentiate them from unweighted dB levels. Similarly, C-weighted values are labeled dBC. C-weighting slightly reduces the level of sounds below 50 and above 5000 Hz, but is nearly flat in between, and can be used to approximate an unweighted reading on sound level meters that only offer A- or C-weighting. Comparing A- and C-weighted levels for a noise source can provide a rough estimate of its frequency distribution. If the two levels are within 1 or 2 dB, most of the noise is above 500 Hz. If the two levels vary by more than a few dB, a significant amount of the noise is in the lower frequencies. To convert unweighted octave band sound pressure levels into weighted A or C levels, add or subtract the amounts noted in Figure 13 from the corresponding frequency bands. Next, sum the octave band levels (two at a time as explained below) to arrive at the overall dBA or dBC value.

As mentioned earlier in the text, calculating the SPL of two sources together is not as simple as adding their individual decibel levels. Two people speaking at 70 dBA each are not as loud as a jet engine at 140 dBA. To combine two decibel values, they must be converted back to pressure squared, summed, and converted back to decibels. The mathematics may be approximated by using Figure 14.
If one sound is much louder than the other, the louder sound drowns out the softer sound, and the combined decibel level is just the level of the louder sound. If the two sounds are equally loud, then the combined level is 3 dB higher. More than two sources can be combined, but they must be considered two at a time. For example, an unbuilt classroom is expected to have 34 dBA of mechanical system noise, a computer that generates 32 dBA of noise, and an overhead projector that generates 43 dBA. What will be the total sound pressure level from the three noise sources? The difference between the first two decibel values is: 34- 32=2, so add 2 dB to the higher value: 34+2=36 dBA. Then combine this with the projector noise: 43-36=7, so add 1 dB to the higher value: 43+1= 44 dBA total from the three noise sources. If the SPL of the teacher’s voice is 55 dBA, what is the signal-to- noise ratio in the room? 55-44= +11 dB, which is sufficient for good speech intelligibility. How much louder is the total 44 dBA than each of the individual noise sources? Due to the response of our ears, we can just notice a difference of 3 dB. An increase of 10 dB sounds approximately twice as loud, and an increase of 20 dB sounds about four times as loud.
Over 100 years ago, a Harvard physics professor named Wallace Clement Sabine developed the first equation for reverberation time, which has since been named after him and is still used today. Reverberation time is defined as the length of time required for sound to decay 60 dB from its initial level. Sabine’s simple formula is:
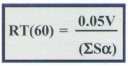
where:
RT(60) = reverberation time (sec)
V = room volume (ft3 )
S = surface area (ft 2 )
a = absorption coefficient of material(s) at given frequency
S indicates the summation of S times ? for all room surfaces
To use this formula, the volume of the room, surface area of each material in the room, and absorption coefficients for those materials must be known. Absorption coefficients are measured in specialized laboratories, and represent the fraction of sound energy (not sound level-dB) the material will absorb as a decimal from 0 to 1. Figure 15 gives absorption coefficients for common classroom materials.
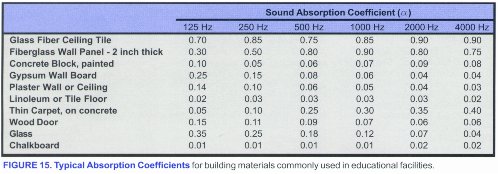
A commonly used one-number rating called NRC, Noise Reduction Coefficient, is simply the average of the absorption coefficients at 250, 500, 1000, and 2000 Hz. This simple, one-number rating can be useful for comparing the relative absorption of two materials; however, examining absorption coefficients in each octave band gives a better idea of the performance of a material at various frequencies.
Reverberation time is often calculated with the room unoccupied. Since people and their clothing provide additional sound absorption, an unoccupied room is the worst-case scenario, though not an unreasonable one, since occupancy of most classrooms varies. In a complete analysis, this calculation should be performed for each octave band, as the RT can vary widely at different frequencies. However, for a quick estimate, the RT of a classroom can be calculated for just one octave band representative of speech frequencies, such as 1000 Hz. If this RT is acceptable, then the RT throughout the speech range will likely be acceptable.
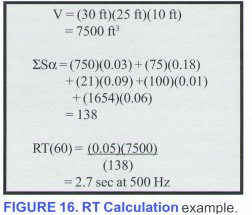
To demonstrate the use of the Sabine equation, Figure 16 provides an example calculation of the RT at 500 Hz for the acoustically poor classroom example given in Figure 10a. Try calculating the RT at 500 Hz of the acoustically satisfactory classroom in Figure 10b with only a sound-absorbing ceiling added. Note that the ceiling is lower in that example, so the volume and surface areas will change. The RT of the satisfactory classroom is approximately 0.4 seconds.


There are many methods for measuring or predicting speech intelligibility, ranging from a simple A-weighted sound level to the complex Speech Transmission Index (STI). For classrooms, speech intelligibility can be predicted from reverberation time and signal-to- noise ratio. A classroom with a 0.5 second RT and +10 dB S/N will have approximately 90 percent speech intelligibility. If the RT is kept at 0.5 seconds but the S/N is reduced to 0 dB, intelligibility falls to about 55 percent. Similarly, if the S/N is +10 dB but RT is increased to 1.5 seconds, intelligibility drops to around 75 percent. And if the S/N falls to 0 dB and RT is 1.5 seconds, intelligibility falls dramatically to approximately 30 percent. Sadly, this last condition does exist in some U.S. classrooms.
Speech intelligibility tests can be used to measure intelligibility in existing classrooms. Such tests can take many forms. Typically, a speaker reads nonsense syllables, monosyllabic words, or sentences, and listeners record what they hear, or choose from a list of possible alternatives. The percentage of test items correctly heard is a measure of speech intelligibility. Standardized tests have been developed that outline test procedure, selection of listeners, training of speakers and listeners, and so on. Also available are recordings of standardized word lists that can be reproduced instead of having a speaker read from a list. This eliminates lip reading cues and variations in different speakers’ speech characteristics and speech levels. Before beginning actual testing, listeners should practice taking the tests in a quiet environment until they are familiar with the procedure and their scores reach a stable level. (Words used are randomly chosen from a standardized list so listeners cannot simply memorize the order of the words.)
When testing in a classroom, the speaker should read the list from the teacher’s usual speaking location. To assure conservative results, several listeners should be seated together in whichever area of the classroom has the poorest signal-to-noise ratio. This is typically in the back, or near the loudest source of mechanical noise. Any noises present during normal classroom use, such as mechanical noise, outdoor noise, or corridor noise, should be present to ensure representative values of speech intelligibility.
Adults average roughly 10 percent better than young children on speech intelligibility tests. For example, in a first-grade classroom in which adult listeners score 90 percent, typical students will likely score only 80 percent. Students with hearing or learning disabilities, or for whom English is a second language, will show even lower scores. If speech intelligibility in a classroom is less than 90 percent, acoustical treatments should be implemented to reduce reverberation and/or improve signal-to-noise ratio.
NOTE: Speech intelligibility testing is not a simple procedure and professional advice is suggested. The school audiologist may be a good resource in this regard.
The noise level in a space can be effectively described with a single-number rating called the noise criteria (NC) rating. The NC rating is determined by measuring the sound pressure level of the noise in each octave band, plotting these levels on a graph, and then comparing the results to established NC curves. The lowest NC curve not exceeded by the plotted noise spectrum is the NC rating of the sound. On most graphs, NC curves are shown in intervals of 5 to save space, but the NC rating can be given as any whole number in between, not just as a multiple of 5. To illustrate this, we will find the NC rating for the window air conditioners, unit ventilator, and background noise from the case study presented above. (See Figures 17 and 18.) A blank NC chart has been provided. (See Figure 19.)
We all know that sound level decreases as the distance from a sound source increases. This decrease in sound level is quantified by the inverse square law. That is, the sound energy decrease is proportional to the square of the distance increase. For example, if the listening distance from a sound source is increased by a factor of 2 (doubled), the direct sound energy is decreased by a factor of 4 or 2 squared (2 times 2). This translates to a 6 dB reduction in the sound intensity level and the sound pressure level of the direct sound for each doubling of the distance from the sound source.
Let’s assume that, in a particular classroom, the average difference between the sound level of the teacher’s voice and the level of the classroom background noise produced by the air conditioning system is 10 dB at a student’s listening position 10 feet from the teacher. With this 10 dB signal-to-noise ratio the intelligibility of the teacher’s speech is probably satisfactory as discussed in the previous section on speech intelligibility. But, if the distance from the teacher to the student is doubled to 20 feet, the signal-to-noise ratio is reduced to about 4 dB (assuming that the background noise remains constant). At a distance of 30 feet the level of the direct sound produced by the teacher is reduced by about 10 dB and the signal-to-noise ratio is 0 dB, with low speech intelligibility. Thus, it is most important that the background noise level be acceptable in all classroom locations if a proper S/N ratio is to be maintained allowing satisfactory speech intelligibility.


FIGURE 19. Noise Criteria Curve
Visit the National Council of Acoustical Consultants for a list of professional acoustical consultants.
To obtain additional copies, please contact:
Acoustical Society of America
Suite 1NO1
2 Huntington Quadrangle
Melville, NY 11747
Phone: 516.576.2360
Fax: 516.576.2377
Email: asa@aip.org
http://asa.aip.org
Copyright © 2000 Acoustical Society of America
All rights reserved
![]()